LOGS IN MCEBUDDY
Open MCEBuddy from the Windows Start Menu, click on the Logs link on the right corner and it will open the folder which contains all the log files.
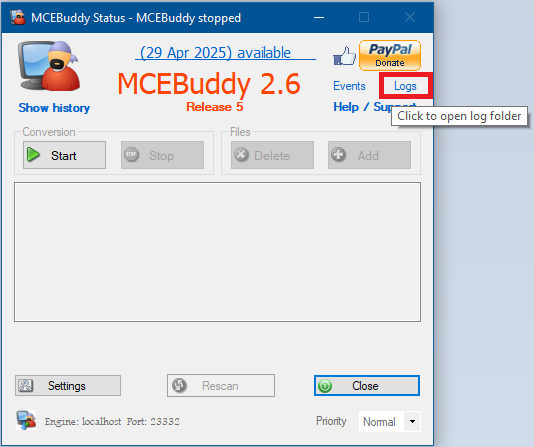
There are two types of log files in MCEBuddy (which you can attach to your posts by dragging and dropping them into your post on this forum):
mcebuddy.log→ Engine log file: MCEBuddy’s settings and details of all the folders and files that the engine scans/monitors prior to starting a conversion. Usually not required.- All other files are individual conversion logs files named as
RecordingFilename-ConversionTaskname-ConversionTimestamp.log. If you have questions about a recording/conversion, you will need to attach the conversion log for that specific recording.
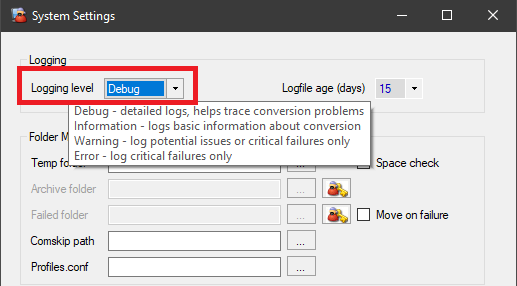
MAKE SURE THE LOGGING LEVEL IS SET TO DEBUG in Settings → System settings otherwise the logs won’t be useful.
You can attach logs to your posts on this forum by dragging and dropping them or clicking on the Upload button in the toolbar

If you want to upload sample video files for analysis follow the instructions below
UPLOADING FILES TO MCEBUDDY SERVER
NOTE: There is a file splitter tool that is available on the mcebuddy server which can be used to split video files and upload the 1st chunk if you don’t need to upload the entire media file (e.g. metadata issues etc).
NOTE: Turn off your firewall if you’re having trouble connecting to the FTP server below.
If you need to upload files for developers to analyze, please upload the media samples and logs using on the options below:
Option 1
COPY AND PASTE URL in WINDOWS EXPLORER: ftp://upload.mcebuddy2x.com
Login Username: mcebuddy
Login Password: mcebuddyYou can upload files by dragging and dropping them
Option 2
Use a FTP client like WinSCP
FTP SERVER: ftp://upload.mcebuddy2x.com
Login Username: mcebuddy
Login Password: mcebuddy
Option 3
Using FileZilla
- Download and install the FTP client FileZilla
- Start FileZilla then copy and paste
upload.mcebuddy2x.cominto theHostinput box at the top of the page, enter the username mcebuddy and password mcebuddy- Then press
QuickConnect- It’ll prompt about an insecure FTP connection, click
OKto continue- Drag files from the left pane (local computer) to the right pane (FTP server)
After logging in to the FTP server:
- Create a folder with your discussion forum screenname
- Create a text file in that folder with a description of the problem and a link to your post on the discussion forum
- Upload your log/video files to the folder
NOTE: Make sure your Firewall and Antivirus doesn’t block the FTP ports (20/21) otherwise it won’t work. If you’re having trouble upload files try using
passiveFTP mode to upload the files.