
I looked around for a “Dummies” guide to setting up MCEBuddy for my Channels DVR. I found some posts with general advice, but nothing as detailed as I wanted. After experimenting, I got MCEBuddy converting my DVR recordings acceptably.
My goal was to reduce the disk space consumed by my Library. I am fine with MCEBuddy overwriting the originals. If you have other goals you may need significantly different settings.
I may have some unnecessary settings applied (for example, I have both Channels and MCEBuddy doing Commercial Skip marking). However, the process works for me. Video files go from several gigabytes to a few hundred megabytes. That’s a big savings in disk space.
Below are some screenshots and notes about the particular settings I used. It converts files in place, replacing the original file with the newly converted file. I do not archive the originals, although that is an option you may choose.
I present this info “as is.” I do not claim to have the best (or even correct) setup. This document is information sharing and nothing more. Use this information at your own risk. I do not have any relationship with Channels DVR or MCEBuddy other than as a user. I am not an expert with either product. Suggestions and corrections are welcome.
Finally, when I first ran this, it ran non-stop for almost a week to catch up, and I excluded imports on the first run. Your mileage will vary based on your Library size.
Settings
When you set up, you need to select monitor locations and specify the conversion task to apply to files found in the monitored locations.
My DVR files are stored in a root at F:\DVR. You will need to substitute your file locations accordingly for your installation.
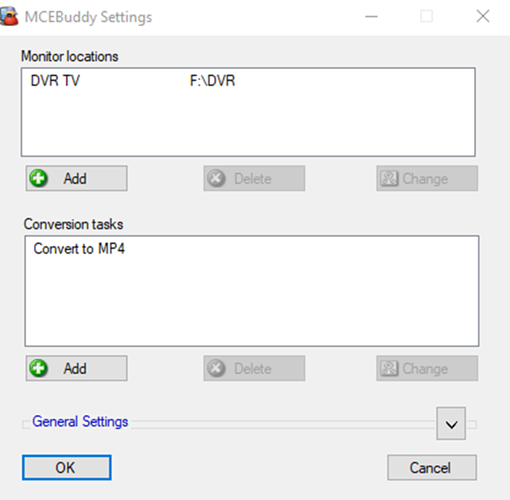
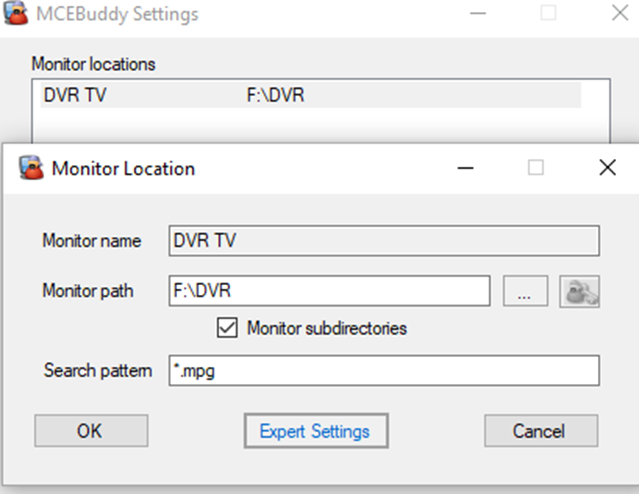
Monitor Location
The monitor location establishes the rules for finding files to convert.
These settings monitor my DVR root folder and subfolders for mpg files. In the Monitor Location Expert settings, you can specify more options.
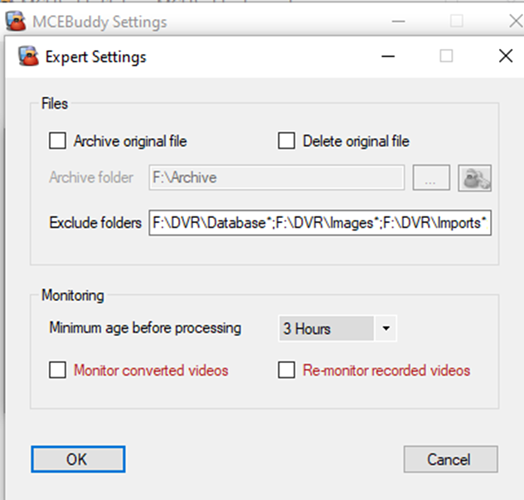
Monitor Location Expert Settings
My set values are for Excluded folders and Minimum age.
Exclude folders accepts a semi-colon separated list of folders. Notice in my list, I add an asterisk (*) to the end of the folders. The asterisk is a wildcard that excludes subfolders. So, F:\DVR\Database* indicates to exclude the DVR Database folder as well as any subfolders under it. Since I chose to monitor the root directory for my DVR, I exclude all nonrelevant subfolders such as Databases, Streaming, Images, etc.
Minimum age before processing inserts a delay before a found file is processed. I set this to 3 hours to allow ComSkip processing time and to keep the server activity lower during prime time, when several recordings may be happening at once.
Conversion Task
A conversion task specified the details of how you want the video files to be converted.
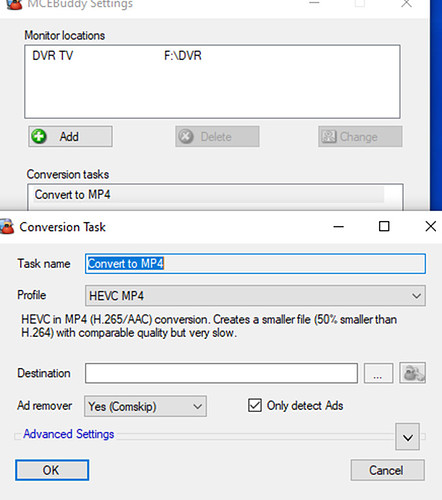
At a base level, you select the Conversion Profile. I selected HEVC MP4 because I have an Nvidia discrete graphics card. You should choose a profile that will work best for you.
Note that I leave the Destination empty. That will cause MCEBuddy to replace the original file with the converted version.
Finally, note that I enabled Comskip. This may be unnecessary if you have Channels DVR running ComSkip. I chose to allow the potential duplication of effort.
By expanding Advanced Settings, you get access to more options.
Conversion Task Advanced Settings
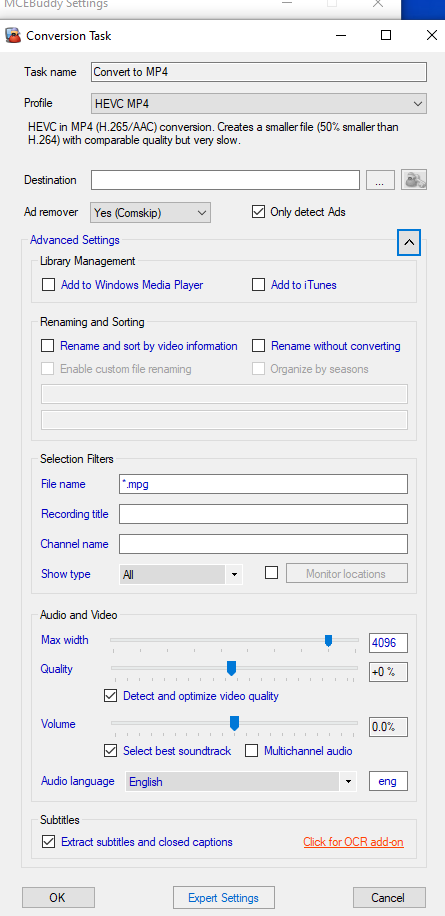
Of note, I set the Selection Filters to look for File Names matching *.mpg – the extension used by Channels DVR.
I also set the Audio language to English, and I opted to have the Subtitles and closed captions extracted to a *.SRT file. Some other video players can use the SRT files to display closed captions/subtitles.
Caution: Allowing MCEBuddy to rename files will both rename and relocate them which will very likely break Channels DVR’s access to the file. Read the docs well before you go down this road.
Important!
By default, MCEBuddy will name the files the same as the originals, but the extension may be different. That will break Channels DVR’s ability to find the file.
In my case, the HVEC MP4 profile would generate files with the *.mp4 extension. To correct this, you need to edit the profiles.conf file located in the config directory where MCEBuddy is installed.
Within profiles.conf, find the profile you selected and add RenameExt=.mpg to the profile.
That instructs MCEBuddy to use the .mpg extension rather than the default. This will keep Channels DVR happy.
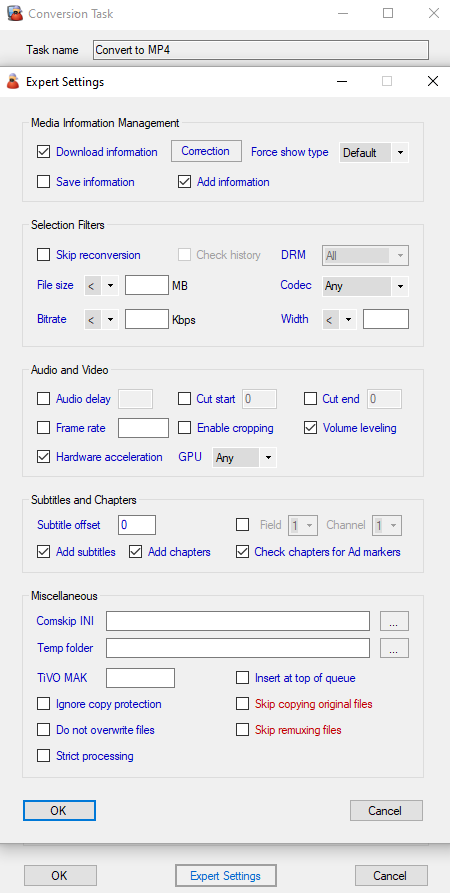
Finally, I did set a few values under Conversion Task Expert Settings.
Conversion Task Expert Settings
I allow MCEBuddy to Download information. That may be superfluous, especially since I have Channels DVR creating the MCEBuddy Metadata JSON information file for each recording.
I enabled Hardware acceleration since I have both a discrete graphics card and a recent version of Intel’s graphics.
Finally, I enable
- Add Subtitles,
- Add chapters, and
- Check chapters for Ad markers
If you do not care about subtitles or chapters, you can ignore those.
That’s it.
As I said, these settings work for me. If you have suggestions or corrections, please post them.
I am fully aware that I may not have selected the best or most efficient choices. However, it does work for me. I hope it helps you. Suggestions and corrections will be appreciated.