MCEBuddy Profiles Basics
Stock MCEBuddy profiles are in the profiles.conf file located in the config directory where MCEBuddy is installed. One can create new profiles or customize existing ones.
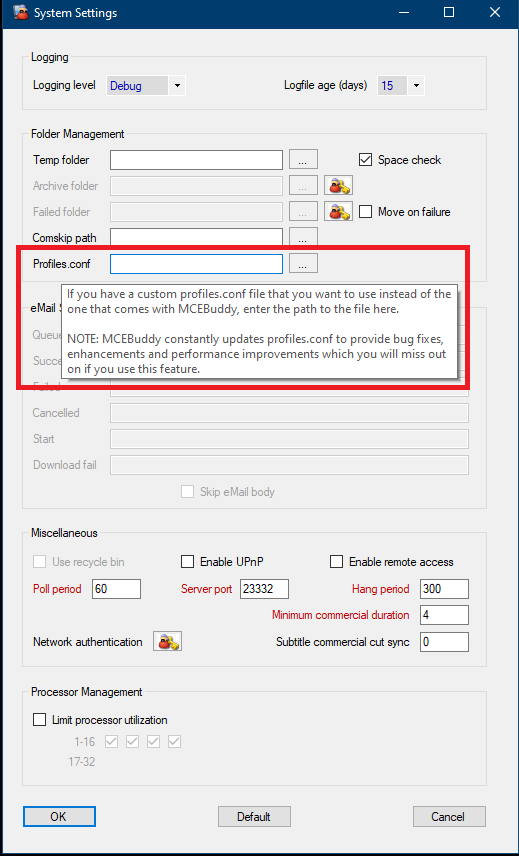
It’s highly recommended to create your own custom
profiles.conffile in a directory outside of MCEBuddy’s installation folder (e.g.C:\MCECustomProfile) and configure MCEBuddy to use that custom profiles.conf from Settings → Expert Settings → Profiles.conf → Click on … → select your customprofiles.confAny customizations made to the stock profiles.conf in the config directory will be lost when MCEBuddy is upgraded (the previous stock profiles.conf will be saved as profiles.conf.old). However, configuring MCEBuddy to use a custom profiles.conf from the Expert Settings page will ensure that it’s not overwritten and will continue to be used even after an upgrade.
The basic intent of the profiles is to create the command line parameter to pass onto the encoders, commercial cutting routines etc.
MCEBuddy uses the following format for building a command line parameter to pass to the encoder:
GeneralParameters + <InputFile> + VideoParameters + AudioParameters + <OutputFile>
Basic Format of a Profile
[<Profile Name>]
e.g. [Convert to MP4]
Name of the profile as it will show up in MCEBuddy
Description=<Profile Description>
e.g. Description=Convert a file to MP4 format
Short description of what the profile does
order=<copy/ffmpeg/mencoder/handbrake>
e.g. order=ffmpeg,mencoder
Specify the order in which to use encoders (primary to backup) to convert the file. You can specify one, two or three encoders from the options listed above each separated by a comma. MCEBuddy will use the first encode to try to convert the file, if that fails then it will try the second and so on. In the above example it will try FFMPEG and if that fails then it will try MEncoder.
copy is a special case, where there is no recoding/encoding, the remuxed file (TS) incase of a WTV or DVRMS source video or the original source file is just copied to the output as the converted file without any processing.NOTE: Each encoder in the order specified REQUIRES a <encoder>-general , <encoder>-video , <encoder>-audio , <encoder>-audioac3 and <encoder>-ext parameter. If any of these parameters are missing the encoder will fail (except for copy encoder). See below for details.
<encoder>-general=<general parameters>
e.g. ffmpeg-general=-threads 0 -async 1
GeneralParameters: For each encoder in the order above the general encoding parameter needs to be specified for the encoder. The general parameters are the first in the command line parameters.
<encoder>-video=<video parameters>
e.g. ffmpeg-video=-ss 3 -vcodec copy
VideoParameters: For each encoder in the order these specify what video parameters are to be passed to the encoder. The video parameters follow the inputs file name while MCEBuddy builds the command line.
<encoder>-audio=<audio parameters>
e.g. ffmpeg-audio=-acodec copy
Audio Parameters: For each encoder in the order these specify what audio parameters are to be passed to the encoder. These are used if the input audio track is NOT ac3. The audio parameters follow the video parameters while MCEBuddy builds the command line.
<encoder>-audioac3=<ac3audio parameters>
e.g. ffmpeg-audioac3=-acodec copy
AudioAC3 Parameters: For each encoder in the order these specify what audio parameters are to be passed to the encoder if the input audio track IS AC3 (does not include e-AC3). MCEBuddy will use EITHER the <encoder>-audio or the <encoder>-audioac3 parameters while building the command line depending on the input audio track format. If this parameter is not defined, then MCEBuddy will use the <encoder>-audio parameters for ac3 and non-ac3 input tracks. The audioac3 parameters follow the video parameters while MCEBuddy builds the command line.
<encoder>-ext=<extension>
e.g. ffmpeg-ext=.avi
For each encoder in the order enter the extension of the output filename. Depending upon the extension the appropriate encoders, commercial cutting program and other parameters will be selected by MCEBuddy. Supported output formats include .wtv, .wmv, .mkv, .avi, .m4v, .mp4, .mpg and .ts
NOTE: As of v2.3.12 MCEBuddy supports almost all formats, however there are limitations on which encoder is being used, e.g. MEncoder works best with .avi, Handbrake with .mp4 and .m4v while FFmpeg can support nearly all formats.
Optional Parameters for Profiles
2pass=<true/false>
e.g. 2pass=true
If set to true then MCEBuddy will do a 2 pass during the conversion else 1 pass
<encoder>-remuxto=<extension>
e.g. mencoder-remuxto=.mp4
For each encoder in the order one can specific of the output file needs to be remuxed into a different format at the end after the first extension is created. E.g. ffmpeg will work best when creating an avi file. It can then be remuxed into mp4. MCEBuddy will choose the appropriate remuxer based on the input and output extension Supported extensions are .wtv, .wmv, .avi, .ts, .mpg, .m4v, .mp4 and .mkv
NOTE: As of v2.3.12 MCEBuddy supports almost all formats.
RenameExt=<extension>
e.g. RenameExt=.mpeg
This is used to rename the file extension just before copying the file to the output directory.
Tweaking and Advanced Profile Parameters
Refer to the MCEBuddy Advanced Parameters page to learn about advanced commands and Profile tweaking