Table Of Contents:
- MCEBuddy doesn’t capture all my commercials or cuts too little/much of the commercials
- With newer MCEBuddy builds (2.3.15 and later) the video conversions fail randomly
- MCEBuddy cannot access a mapped drive, network path/share or other drives such a google drive, dropbox drives etc
- MCEBuddy is not able to see or work with files on a network path/share
- I’m not able to use a network path for Monitor Path or Destination Path. It gives an error or nothing happens
- I’ve setup MCEBuddy to monitor folders but it won’t add files/not all files show up in the queue
- I’m adding files to MCEBuddy but it won’t show up in the queue
- I keep getting MCEBuddy Service is unavailable. Please start from windows control panel or check engine connection.
- I am unable to access files created by MCEBuddy from a remote computer on my shared drive
- I am unable to connect to the MCEBuddy engine using the Remote Client
- MCEBuddy is causing to my computer to hang or crash (BSOD)
- MCEBuddy sometimes creates video with no audio or a narrative audio track
- How do I prevent MCEBuddy from reconverting my videos
- My audio is out of sync with my video
- The video I’m converting succeeds but has garbled video and audio
- When I use the MKV profile, I am unable to play it back with Windows Media Player
- When I use an Unprocessed profile, I am unable to play it back with Windows Media Player
- My video is stuttering/broken after conversion
- My original video has 6 channel/multichannel audio but my converted file only has stereo/2 channel audio
- System does not wake up from standby/suspend even though I’ve enabled the Wake option in the settings page
- System goes to sleep even if I have Unchecked Allow Sleep in the Settings page
- MCEBuddy does not start and stop at the time entered in the Settings page
- All conversions keep failing
- Files are immediately removed from the queue after starting the conversion
- Random files keep failing at random points during a conversion
- Conversion never finishes (it just hangs)
- I pressed Start, I can see the files in the queue but Conversion task is showing Idle or Paused
- When I extract Closed Captions (CC) and Subtitles, they are out of sync by a few seconds OR get progressively out of sync after each commercial segment
- MCEBuddy seems to “hang” or have high CPU utilization while starting or adding files
- How do I use my custom EDL and Closed Caption/Subtitles files while converting the videos
- I’m trying to convert my video but after a few minutes the converted file has no audio
- My original WTV file works fine in Media Center Media Extender devices but I am unable to play back WTV files created by MCEBuddy in Media Center Media Extender devices
- I’m using the WTV profile but the WTV videos created by MCEBuddy won’t play on Windows Media Player or Windows Media Center
MCEBuddy doesn’t capture all my commercials or cuts too little/much of the commercials
Cause
MCEBuddy uses Comskip and Showanalyzer to identify commercials (Comskip comes installed by default, you can choose to install ShowAnalyzer while installing MCEBuddy). The default ad detection settings for Comskip and ShowAnalyzer that ship with MCEBuddy are designed to be broadly compatible with most channels across the world. These settings may need to be adjusted to your country/channel to make it more accurate.
Resolution
- If you’re using Comskip take a look at the Comskip tuning guide to adjust the ad detection settings to suit your channel/country.
- If you’re using ShowAnalyzer take a look at the ShowAnalyzer tuning guide.
With newer MCEBuddy builds (2.3.15 and later) the video conversions fail randomly
Cause
When hardware acceleration is enabled, the stability of the conversion depends upon the stability of the graphics drivers. Older Intel graphics drivers are unstable and cause handbrake and quicksync to crash and conversions to fail randomly.
Resolution
Upgrade to the recommended Intel graphics drivers to fix the issue. See this topic for more details: GPU/Hardware Encoding/Acceleration FAQs
MCEBuddy cannot access a mapped drive, network path/share or other drives such a google drive, dropbox drives etc
Cause
\\<Network share> does not exist or MCEBuddy doesn’t have read permissions, skipping
Drive has not accessible to LocalSystem account
Network path is password protected
Network path is already mapped by Windows
No username has been entered in the authentication pages of MCEBuddy settings
Network path is offline
Resolution
If you’re using a network path/share, mapped drives, google drives or any other non local drives, make sure these drives are available to the LocalSystem account for services running in system login. By default mapped drives are ONLY available for the user who has logged into the system and then mapped the drives (network, google, remote etc) in the user login.
Since MCEBuddy runs as a service in using the LocalSystem account. Think of this a system login. You normally login through your own user login. So when you map network drives it is only valid for apps that are running through your user login. Since MCEBuddy is running through a system login your mapped drives and credentials doesn’t exist in the system login session (you entered them in your own login session).
To summarize, these are the options:
1. When MCEBuddy is running as a LocalSystem service, to access network shares that have usernames and passwords you need to enter the username and password for each share separately in MCEBuddy. Use a fully qualified network path in MCEBuddy like
\\<machine or IP Address>\<share name>and enter theusernameandpasswordcredentials for that path in MCEBuddy by clicking on the credentials () icon next to the path. Do not use your mapped drives (e.g. Z:) since they don’t exist outside your user login session.
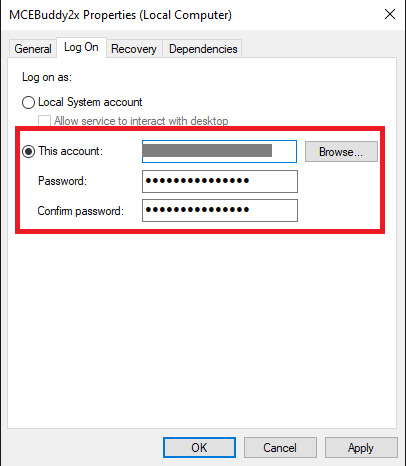
2. Run the MCEBuddy2x windows service with the local user credentials (i.e. as a user login session). To do this open Windows → Control Panel → Local Services then double click the MCEBuddy2x service. Click on the
Log Ontab, change the Log on as: toThis account. Enter your local user loginusernameandpasswordand click Ok. Now all your user mapped drives (e.g. Z:) will be available to MCEBuddy. See the screenshot below for details:
3. Run MCEBuddy Engine as a Command Line Service from the Start Menu -> MCEBuddy -> MCEBuddy Command Line Service. This runs the engine locally (after the user has logged) from the User’s login and hence all mapped drives available to the user will be available to MCEBuddy.
a. For accessing network shares through CustomCommands you need to add the network login credentials to Settings -> Expert Settings -> Network Authentication. This MUST match the same credentials that have been used to access the network share via Windows Explorer or if the network share has been mapped to a drive. See point b. below
b. Check if the path has already been mapped by Windows. To check the mappings, open a command prompt (Start -> Run -> cmd). Type
net useand it should show you the mapped drives. Make sure you are using the same credentials that have been used to map the network shares/drives in Windows. Windows only allows for one set of credentials per network share. If you don’t need the mapped drive/paths you can disconnect them using the commandnet /delete <pathname>c. Make sure the network drive is connected and accessible.
Windows is VERY FINICKY. You cannot map the same Network share more than once with different credentials.
If you’ve connected to the remote computer using Windows Explorer or the Run command, then you’ve already logged in with one set of credentials. If MCEBuddy now tries to connect with a different set of credentials it will FAIL since Windows will reject it.
MCEBuddy is not able to see or work with files on a network path/share
Cause
Network path is password protected
Network path is already mapped by Windows
No username has been entered in the authentication pages of MCEBuddy settings
Network path is offline
Resolution
a) If you’re using a network path/share in the Monitor Task to monitor a network folder or if you’re using a network path/share as the destination folder in the Conversion Task, make sure you enter the username and password in the MCEBuddy Credential box next to the Monitor Path or Destination Path text box by clicking on the button. Even if you shared the network share without a password or anonymous or guest or everyone, you MUST enter atleast
Guestin the username of the credential page. This is because MCEBuddy uses LocalSystem account and not the local user account to authenticate on the network, so the mapped drives or logged on user authentication will not be accessible by MCEBuddy.b) If you’re using the Add File button or dragging and dropping files/directories into the queue then you need to add the network login credentials to Settings -> Expert Settings -> Network Authentication. This MUST match the same credentials that have been used to access the network share via Windows Explorer or if the network share has been mapped to a drive. See point c) below.
c) Check if the path has already been mapped by Windows. To check the mappings, open a command prompt (Start -> Run -> cmd). Type
net useand it should show you the mapped drives. Make sure you are using the same credentials that have been used to map the network shares/drives in Windows. Windows only allows for one set of credentials per network share. If you don’t need the mapped drive/paths you can disconnect them using the commandnet /delete <pathname>d) Make sure the network drive is connected and accessible.
Windows is VERY FINICKY. You cannot map the same Network share more than once with different credentials.
If you’ve connected to the remote computer using Windows Explorer or the Run command, then you’ve already logged in with one set of credentials. If MCEBuddy now tries to connect with a different set of credentials it will FAIL since Windows will reject it.
I’m not able to use a network path for Monitor Path or Destination Path. It gives an error or nothing happens
Cause
Network path is password protected
Network path is already mapped by Windows
No username has been entered in the authentication page of MCEBuddy settings
Network path is offline
Resolution
a) Make sure you enter the username and password in the MCEBuddy Credential box next to the Monitor Path or Destination Path text box by clicking on the button. Even if you shared the network share without a password or anonymous or guest or everyone, you MUST enter atleast Guestin the username of the credential page. This is because MCEBuddy uses LocalSystem and not the local user authentication and local system does not authenticate on the network.
b) Check if the path has already been mapped by Windows, this can create a conflict.
To check the mappings, open a command prompt (Start -> Run -> cmd). Typenet useand it should show you the mapped drives. You’ll have to disconnect the necessary paths (net /delete <pathname>).
Alternatively, map your path to a drive in window (explorer -> tools -> map network drive) and then don’t enter any username and password in mcebuddy instead use the mapped drive.c) Make sure the network drive is connected and accessible.
Windows is VERY FINICKY. You cannot MAP the same COMPUTER 2 times with different logins.
If you’ve connected to the remote computer using Windows Explorer or the Run command, then you’ve already logged in with one set of credentials. If MCEBuddy now tries to connect with the configured credentials it will FAIL since Windows will reject it.
1. Either use your own credentials and MAP the remote computer folder using Windows explorer and DO NOT enter any credentials in the Monitor Task or Conversion task pages for that remote computer. In this case MCEBuddy will use the Windows Explorer credentials.
OR
2. Enter the credentials in the MCEBuddy Monitor Task and Conversion Task page and let MCEBuddy connect to the remote computer.
Remember you CANNOT DO BOTH of the above, otherwise MCEBuddy will not be able to access the remote computer.
I’ve setup MCEBuddy to monitor folders but it won’t add files/not all files show up in the queue
Cause
The monitor path is invalid/incorrect
The file search pattern for the Monitoring folder does not match the files in the directory
The filters on the Conversion Task Settings page don’t match the file metadata
The files are marked readonly or are locked by another process. MCEbuddy needs exclusive access to convert files.
Resolution
Check the monitor location directory configured in the monitor locations tasks
Check the file search pattern (e.g.*.wtv) for the monitoring location task. It may not be setup to accept all video/video files types in the directory being monitored.
Remove the readonly option on the files, right click on the file and select properties. Uncheck the ReadOnly box.
If the file is locked by another process, you’ll have to find out which process and then close the process/release the file.Check the Filename, Showname and Network name Filters on the Conversion Task Settings page
Refer to the MCEBuddy Advanced Commands page for more details on filename and showname pattern matching.
I’m adding files to MCEBuddy but it won’t show up in the queue
Cause
The files are marked readonly or are locked by another process. MCEbuddy needs exclusive access to convert files.
The filters in the Conversion Task Settings do not match the Metadata on the file
Resolution
Remove the readonly option on the files, right click on the file and select properties. Uncheck the ReadOnly box. If the file is locked by another process, you’ll have to find out which process and then close the process/release the file.
Check the Filename, Showname and Network name filters in the Conversion Task Settings page. If the filters don’t match the metadata on the file, the files will not be added to the queue.
I keep getting MCEBuddy Service is unavailable. Please start from windows control panel or check engine connection.
Cause
A hardware driver terminated MCEBuddy
OR the service has not been started
OR there is a conflict with another port
OR ShowAnalyzer is causing MCEBuddy to hang
Resolution
Check that the service has been started. Click Start -> Control Panel -> Windows Services -> Select MCEBuddy 2.x -> Right click and click Start
If the engine crashes when trying to convert a file this indicates a hard disk corruption. The hard disk driver will terminate MCEBuddy when trying to access a corrupted file. The corrupted file could be either the MCEBuddy installation or the file/video it’s trying to access which may be corrupted. Delete the file and uninstall/reinstall MCEBuddy as a temporary solution, the underlying cause is a failing hard disk which should be replaced at the earliest.
If there is a conflict with another port, MCEBuddy will fail to start, check the Windows Event logs for more information and see the Installation Issues for more details.
If you have ShowAnalyzer installed; there’s a bug in ShowAnalyzer which causes it to hang. The MCEBuddy User Application makes a call to check the status of ShowAnalyzer which causes it to hang and it presents itself as not able to connect to service issue.
Uninstallation, rebooting the computer and reinstalling Showanalyzer usually solves the problem. If it persists, try to uninstall ShowAnalyzer and use Comskip instead.
I am unable to access files created by MCEBuddy from a remote computer on my shared drive
Cause
Permissions or owner are set incorrectly on the parent folder which causes the files created by MCEBuddy to inherit permission that don’t match the shared folder permissions.
Resolution
Ensure that the destination folder and the files are inheriting the permissions from the parent folder and the parent folder has the permissions you need for others to view the files (e.g. Read/Write/Modify for Guests or any other user). Also ensure that owner for the parent folder is set to you.
I am unable to connect to the MCEBuddy engine using the Remote Client
Cause
Firewall is blocking the ports
Engine is not running
Resolution
On the machine where MCEBuddy engine is installed, check Enable remote access from Settings -> Advanced Settings -> Expert Settings. This will allow MCEBuddy to automatically create an exception in the Windows Firewall to allow incoming connections to the engine on the configured port. This only works with Windows Firewall, if you have a custom firewall then you’ll have the configure it manually.
Ensure the MCEBuddy engine is running
MCEBuddy is causing to my computer to hang or crash (BSOD)
Cause
MCEBuddy causes a lot of stress on system drivers causing a faulty system driver or hardware to fail or hang the system. MCEBuddy CANNOT cause a system crash or hang because it’s a managed application, the ONLY piece of software that can cause Windows to crash or hang is a driver.
The hang or crash is because of a faulty driver (it is the only piece of code privileged enough to cause a bug check) or failing hardware on the system. At most an application can cause itself to crash where as kernel mode driver or failing hardware can cause a bug check or hang.
Resolution
Most likely it is either your video driver, chipset driver, hard disk driver or faulty hardware which under stress is exposing the flaw. MCEBuddy can be quite stressful on the system so keeping good hardware and drivers (latest drivers are not always the most stable) is paramount.
For a crash, to isolate the root cause of the bug check you will need a software like WinDBG to analyze the kernel memory dump created by windows in the windows\minidump directory. This will tell you which driver caused the panic and why (big check code).
You will need to start uninstalling or updating your drivers to find out which one is causing the issue.
The most common cause of a crash is a faulty graphics driver. Start by disabling hardware acceleration in the Conversion task → Advanced settings page. If that resolves the issue, replace your graphics driver with a stable version.
The second most common reason is a SSD/HDD that’s going bad, followed by RAM that is failing.
See this page for more details: Reboot with no BSOD - #2 by RBoy
MCEBuddy sometimes creates video with no audio or a narrative audio track
Cause
Some recording have multiple audio tracks, sometimes these audio tracks do no contain any audio or contain a narrative track (vision impaired).
Resolution
Which audio track is selected depends up on how MCEBuddy is configured. If Select the best soundtrack is checked, then the encoder (handbrake, ffmpeg or mencoder) will decide the best audio track to use. Often Handbrake can get this wrong while ffmpeg is better at it. If you’re using this option, try to change the order in your profiles.conf to have ffmpeg as the first encoder.
The other option is to uncheck Select best soundtrack, in which case MCEBuddy will choose the best audio track with the highest number of audio channels and highest bitrate.
If you want a specific audio track, add the file to the conversion queue, right click on the file and select MediaInfo. This will show all the available audio tracks in the file. If the file contains impaired audio tracks then note the language of the audio track which NOT impaired. Open Settings-> Change Conversion Task Settings -> Advanced Settings -> Audio Language. Select the audio language of the non-impaired audio track as determined from MediaInfo earlier. Do not worry if more than one audio tracks (impaired and non-impaired) have the same language. MCEBuddy will choose the non-impaired audio track when an Audio Language has been selected.
For advanced users also refer to this topic for customizing profiles: MCEBuddy - Understanding Profiles Basics
How do I prevent MCEBuddy from reconverting my videos
There are multiple options to prevent MCEBuddy from reconverting video files:
- If you’re upgrading from a version before 2.1.7 please save the history file manually (C:\Program Files\MCEBuddy2x\config\history) and restore it after upgrading. (2.1.7 and above save the history file during uninstallation and restore it on installation)
- If you’re using 2.1.5 or greater you can use this option to manually add the files not to be converted to the history file in the following manner. In Windows Explorer select all the files you want to add to the history file. Drag and Drop them into MCEBuddy window (MCEBuddy should be started and it should start converting them). Now select all the files in the conversion queue (Click on the 1st file and press Shift + End) and then click Delete. It will stop converting all the files and add them to the History file and they will not be reconverted unless you add them manually.
- Create a folder called MCEBuddyArchive. Put all files you don’t want converted into this folder, MCEBuddy will not convert any files inside this folder. Please note, when the Archive Files option is selected in the advanced settings page, MCEBuddy does this automatically.
- Open the Conversion Task you’re created. In the Advanced Settings is a File Name Match (read the documentation MCEBuddy Advanced Commands). You can specify a negative filter (with
~) to specify which files NOT to convert OR a regular filter to specify which files to convert.- If you’re using the Monitor Locations option to automatically convert videos by monitoring a folder for new videos AND the Monitor Folder and Destination Folder are the same, change the Monitor Location Search Pattern. E.g. all source videos are WTV files, all destination videos are MP4. Open the Monitor Location task and set the Search Pattern to
*.wtv, so now MCEBuddy will only pick up WTV files to convert. Or you can use a -ve filter again like[videos];~*.mp4or*.*;~*.mp4to convert all files except .mp4 (the[videos]or*.*is important to specify since there must be atleast one +ve filter to select files)
My audio is out of sync with my video
Cause
There are many reasons for the Audio to be out of sync with Video. It can vary from corrupted frames to country format differences.
Resolution
There are many things can do to resync the Audio with the Video.
- If you’re using a FFMPEG profile, trying setting the -ss parameter to -ss 30 to see if that solves the problem.
- Try setting the <encoder>-audiodelay=skip for the profile you’re using.
- If point 2 does not work, then you can use the same parameter and replace skip with a +ve or a -ve number. This will advance or retard the audio by that many seconds. This can help bring the Audio back into sync with the Video through trial and error. Make sure you replace <encoder> with the profile encoder you’re using. e.g. ffmpeg-audiodelay=1.25
- If you’re using MEncoder in your profile and your audio is going out of sync ONLY when commercial removal is enabled then try to use the mencoderedlskip=true option to use the MP4Box fallback method to strip out commercials. (again this will only help if commercials removal is causing the desync in audio while using MEncoder).
- If you’re using FFMPEG or Handbrake and .mp4 or .m4v outputs then try playing with CutMP4Alternative=true
- Try setting UniversalCommercialRemover=true if the above doesn’t work.
Refer to the MCEBuddy Advanced Commands for more details on the above.
The video I’m converting succeeds but has garbled video and audio
Cause
The video is copy protected.
Resolution
Record a non-copy protected video. There is no way to convert copy protected videos. To check for Copy Protection, right click on the video -> click properties. Check the Video properties page and look for the copy protection field.
When I use the MKV profile, I am unable to play it back with Windows Media Player
Cause
There is no MKV Media Splitter for Windows Media Player
Resolution
Download and install a MKV Media Splitter, e.g. Haali Media Splitter
When I use an Unprocessed profile, I am unable to play it back with Windows Media Player
Cause
Windows does not have a MPEG-2 video splitter installed
Resolution
Download and install a MPEG-2 video splitter. e.g. FFDSHOW
My video is stuttering/broken after conversion
Cause
- Source video is corrupted or broken
- Check the log files, if the average rate of dropped and/or duplicate frames are high, MCEBuddy is unable to detect the correct video frame rate which leads to stuttering video.
Resolution
For corrupted original video, check the quality of the recording signal. A low quality signal can lead to corrupted recordings.
For incorrect frame rate issues, open mcebuddy.conf. Under the section [FFMpegBackupRemux], replace auto in -r auto with the correct frame rate of the video. (this can be done via trial and error or with the help of 3rd party software)
e.g.
-r 25
e.g.-r 30*1000/001`Refer to MCEBuddy Advanced Commands for more details.
My original video has 6 channel/multichannel audio but my converted file only has stereo/2 channel audio
Cause
MCEBuddy by default limits all the output audio to 2 channel audio (stereo) to preserve compatibility with many 3rd party players and Windows Media Player (which doesn’t support multichannel audio).
Sometimes when source video files have multiple audio tracks with different number of channels, MCEBuddy downmixes the audio to preserve compatibility.
Resolution
In MCEBuddy, in the Conversion Tasks page, under Advanced Settings, enable Multichannel Audio. This will tell MCEBuddy to output multichannel audio if the source video has multichannel audio.
If your source video has multiple audio tracks, then in the Conversion Tasks page, under Advanced Settings, select the Audio Language or enter the 3 digit Audio Language code corresponding to the audio track you want to keep. You can find out which audio tracks are there in the source file by right clicking on the file in the conversion queue from the MCEBuddy main Status Page Window and selecting MediaInfo.
System does not wake up from standby/suspend even though I’ve enabled the Wake option in the settings page
System goes to sleep even if I have Unchecked Allow Sleep in the Settings page
Cause
Windows sometimes by default sets the Operating System to disable Wake Up timers. this is especially true for portable systems and laptops. When the System Wakeup timers are disabled no application can wake up the system from standy/suspend mode. Also sometime computer BIOS have disabled wake timers and wake support.
Resolution
Make sure Allow Wake from USB (or equivalent power wake options) are enabled in the BIOS.
Make sure Wake Timers are enabled in the system. Follow the steps below to enable Wake Timers.
1. Open the Control Panel (start -> Control Panel)
2. Look for Power Options and open it
3. For the active plan (the plan with the dot next to it), click on Change Plan Settings
4. Click on Change Advanced Power Settings
5. Click on the + next to the Sleep option
6. Click on the + next to Allow Wake Timers
7. Set the option to Enable for On Battery and Plugged In
8. Click OK
MCEBuddy does not start and stop at the time entered in the Settings page
Cause
The wake and start time are accidentally set in a 12 hour mode
Resolution
Set the start and stop time in a 24 hour mode. i.e.
01:30 PMshould be set as13:30
All conversions keep failing
Files are immediately removed from the queue after starting the conversion
Random files keep failing at random points during a conversion
Conversion never finishes (it just hangs)
Cause
MCEBuddy is running out of diskspace and the conversions fail in between at random points when it runs out of disk space. This is aggrevated when multiple conversions are being used.
Antivirus software is interfering with the conversion
Resolution
a) Sometimes Antivirus software such as AVAST are known to interfere with MCEBuddy. These software lock down the file when it is accessed by MCEBuddy and this causes the conversion not to start, hang or randomly fail. Try to disable the Antivirus and see if that solves the problem.
b) MCEBuddy needs 3 TIMES the size of the file being converted as free space on the INSTALLATION DRIVE. i.e. If MCEBuddy is installed on C drive and you’re converting a 4GB file then you need 12GB of free space on C drive.
NOTE: MCEBuddy needs 1.5X free space for EACH file being converted simultaneously. i.e. if you have 3 simultaneous conversions and each file is 4GB in size, you need 1.5x3x4 = 18GB of free space on the installation directory!
If you do not have enough space in the installation drive, you have 2 options
1. Reduce the number of simultaneous conversions
2. Set the temp directory to point to a different drive where there is more space. Refer to MCEBuddy Advanced Commands for more details.
I pressed Start, I can see the files in the queue but Conversion task is showing Idle or Paused
Cause
The Start/Stop conversion time scheduler has been set on the settings page and the current time is not within the specified conversion period
The Pause button has been pressed
Resolution
There are the following options:
1. Wait for the conversion time period specified in the settings page and MCEBuddy will start automatically
2. Click settings and change/disable the Start/Stop time period in the settings page
3. Click on the Resume button on the GUI page
When I extract Closed Captions (CC) and Subtitles, they are out of sync by a few seconds OR get progressively out of sync after each commercial segment
Cause
These are quirks of cutting mpeg files which sometimes requires manual adjustment
Resolution
In the Conversion Task → Expert Settings page, in the
Subtitle offsetbox, (this optional will be available whenExtract subtitles and closed captionsis checked on the previous page), enter the number of seconds to adjust the subtitles (+ for forward or - for back). This will cause MCEBuddy to timeshift all the Subtitles to correct the sync issue. If you are seeing the subtitles get progressively out of sync after each commercial that was cut, then in the Settings → General Settings → System Settings page underSubtitle commercial cut syncyou can enter the number of seconds it is progressively going out of sync after each commercial segment is cut. See this topic for more details:
Adjusting Subtitles / Closed Captions sync after removing commercials
MCEBuddy seems to “hang” or have high CPU utilization while starting or adding files
Cause
Sometime a very large history file or a corrupted history file can cause MCEBuddy to hang.
Similarly other corrupted files can cause MCEBuddy to hang.
Resolution
1. Delete the history file (in the <MCEBuddy installation>\config directory (or you can click on Show History on the main GUI page and click Clear History)
2. If that does not work, do a clean install of MCEBuddy (refer to Installation Issues -> How do I do a clean install of MCEBuddy)
How do I use my custom EDL and Closed Caption/Subtitles files while converting the videos
Resolution
Place the .EDL and/or .SRT files along with the source video. MCEBuddy will automatically pick up these files (make sure Remove Ads is set to Comskip or Showanalyzer and/or Extract CC is enabled in the Conversion Task - MCEBuddy will use the custom EDL/SRT files before generating new ones). Also make sure they have the same name as the source video.
e.g. Source video -> MySerial.wtv
EDL File -> MySerial.edl
SRT File -> MySerial.srtRefer to the MCEBuddy Advanced Commands for more details on Custom EDL/SRT Files.
I’m trying to convert my video but after a few minutes the converted file has no audio
Cause
TV shows sometimes change the audio formats between shows/advertisements which causes FFMPEG, Mencoder to fail.
Resolution
Calculate (in seconds) the amount of time the previous show/advertisements are recorded before the start of the main show, add a few seconds to it for safety and put that value in the Start Trim box under Conversion Tasks -> Advanced Settings.
E.g. There is 2 minutes and 30 seconds of video before the main show starts, put
155in the Start Trim box.Similarly calcuate the number of seconds after the show ends of video that is recorded (next show/advertisements) and put that value in the End Trim box.
This will make MCEBuddy trim the start and end of the video and leave just the show for conversions which should solve the problem of changing audio formats.
My original WTV file works fine in Media Center Media Extender devices but I am unable to play back WTV files created by MCEBuddy in Media Center Media Extender devices
Cause
Some devices don’t support h.264 video in WTV files (which is created by the WTV profile)
Resolution
Use the WTV Legacy profile which uses MPEG2 in WTV for older devices like Ceton Echo and Linksys DMA2100.
The other option is to use the WTV Unprocessed profile if your original video plays back correctly on your Extender.
I’m using the WTV profile but the WTV videos created by MCEBuddy won’t play on Windows Media Player or Windows Media Center
Resolution
This issue has been resolved with 2.3.15 and newer versions of MCEBuddy.